Monday 29 July 2013

The Battle of Watling Street


This Sunday at the Hall of Heroes, Campbelltown NSW, one of the epic battles of Ancient Britain was refought using 'Hail Caesar' rules.

Episcope view - Bluenoses Sir! Farsands of Em!
The exact location of the battle remains a mystery, but it was known that it was fought on a ridge between two densely wooded forests, where the Roman Army was drawn up with its flanks secure...
By Jupiter! - they're coming through the forest lads!
Although Rees on the Celt side clearly wasn't paying attention to that part of the briefing as he fed his warbands through the forests to outflank the Roman left - the druids must have helped them out with some mysterious pathways...

Call for the Druids - we call upon the spirits of the Forest to aid us break that iron line...
On the day the Romans used saw tooth tactics to break up the warbands and grind them down, and Hail Caesar offers the Wedge formation to allow this to be replicated:


But our trusty Auxiliaries fought in line, so that we had a combination of line and wedges, with a few columns for our reserves:


The Roman team consisted of Matt and Rob as well as myself. For the celts Rees was assisted by Dave, or 'Custer', who is alway ready with a Cavalry charge, but light chariots will do too!

Up! - Aim! - Loose!
Needless to say half a dozen rampaging warbands appearing on the Roman Flank upset the 'cursus honorium' a trifle:


Whereas to the front, despite wave after wave of screaming, hopped up Bluenoses, bouncing off our shields, the line was holding, just:


We'd set the victory conditions for the Ancient Britons that they clear the ridge of Romans by 10 moves, recycling all of their defeated units. By the end of the game they had succeeded in gaining the left half of the ridge, so we called it a draw.

The Hall of Heroes shop armies get a run out once more...
A hard fought but sporting game, played over gorgeous terrain and great to see Matt's shop army collection growing ever larger. Hail Caesar is not too much of a stretch for Napoleonics buffs like myself who are familiar with Black Powder, and I for one thoroughly enjoyed myself!
Vale!


Friday 26 July 2013

Vitoria 200th - eventually!


The original plan was to hold our 200th Anniversary refight of the Battle of Vitoria on the closest Thursday night to the actual anniversary - 20th June, with the actual anniversary being on the 21st. Pretty close! But it was exam season at Uni, and, not entirely unreasonably, the Uni expected to be able to use its examination rooms for the holding of - exams! Hence we postphoned until yesterday!

The table set up - the French team have yet to deploy...
The scenario concentrated solely on General Graham's attempt with the Fighting 5th Division to cut off the French army's line of retreat by seizing the bridge at Gamorra Mayor and cutting of the French line of retreat to the high road North back to France. Unfortunately this might involve taking the heavily fortified village first - or would it?

Taking the waters...an unfortunate Hussar is swept off, to be rescued by a downstream Gunner - how embarrasing!
To make more of a game of it, I decided to allow the possibility that the river might be fordable - it was after all high summer. The river was divided into 2 sections, above and below the town, and each section, upon investigation, might present the possibility of being forded, with varying levels of delay and disorder, upon a 4,5,6 on D6.


The French orbat consisted of 2 Infantry brigades, with one Bn detached to form the Garrison of Gamorra Mayor, a Cavalry Bde complete with light horse battery, and light and heavy foot batteries. After grumblings about my house rules at the Gettysburg game I am now determined to play Black Powder completely untweaked. So all troops stats were directly out of the Albion Triumphant Peninsula supplement. However, I did extend artillery ranges with the simple formula of poundage = max range in feet, and canister is 18". This gave the French 12 Pounders a long range of 12', effective range 6', and the British 9 Pounders an 9' range, which seemed to work well.


The Anglo-Portuguese forces representing the 5th Brigade had 3 Brigades of Infantry, and a cavalry Bde, complete with horse guns.Unfortunately I only have 2 Portuguese units in my 28mm collection, but one of these, the 12th Infantry Regiment Tras os Montes, was to make quite a name for itself this day.

A British Infantry Bde - 4 Regiments of foot and a skirmish unit (off scouting to the front); Royal Irish, 1st KGL Line, 2/30th, 1/57th. The Irish and Germans painted by Fon's crew at MMPS - highly recommended!
The British objective was to seize the Bridge within 8 moves, the French aim was to stop them. The French were entirely free to deploy up to halfway down the table, so had the choice of a forward defence or concentrating around the bridge and river. Wisely, they opted to place their centre of gravity to the rear, to await the outcome of the fordability of the river.

79th Foot The Cameron Highlanders - with the 'Fierce Fighters' attribute...
They lost no time in testing the waters, and discovered, to the cost of a dripping wet Hussar, that the Southern half of the river was to deep to be fordable, but the gunners posted at the Northern bank reported that it ran fairly shallow there. Accordingly the French shifted their weight forward and North...


Meanwhile the British, after a couple of command hiccups, strode forward resolutely...Bryan unwisely accepted Alan's assurances that he was 'a dab hand with the horses', while the rest of us kept straight faces, and was accordingly given command of the British Cav Bde. Perhaps I should have mentioned the Command Value of the Cavalry Brigadier was only 7 earlier! But in true Hussar stylie he recieved a bonus if giving a charge order...So the inevitable occurred:


One of the French Regiments only managed to form a disordered square, so for a while it looked like Alan's rashness might have to be amended to boldness, but eventually the cavalry charge was repulsed.

The 23rd Foot (Royal Welch Fuzileers) lead the assault
Not to be outdone, Bryan launched the middle British Brigade at the fortified village, and, against the odds, won the first round of combat! However the French, we decided on the throw of a die, clung to their defences, and hence the +2 on their saving throws, for the second round of combat, and duly evicted the assaulting troops.


However these unsuccessful assaults may have had the effect of rattling the French team? At any rate they committed their heavy cavalry reserve...

20th Ligne charge the 26th Foot (The Cameronians). Not of course to be confused with the Cameron Highlanders..Lord No! Made that mistake once in the Royal Scots mess - thats an hour of my life I won't get back again...
And Dave launched local counterattacks all along the line. These were intially successful, but the Portuguese 12th IR stepped in valiantly to stablise the line - the first of 2 French Battalions they were to send packing this day...As Lord Wellington said 'The Fighting Cocks of the Army'!
Caesar, Dave and Bryan. Alan is tending the boom box. After my 'Sharpe Sounds' CD, which features no less than 5 versions of 'O'er the Hills and Far Away', we listened to his thoughtfully put together album of 1813 music...
After the intial repulse, Bryan was determined to prepare for his second assault on the town properly. He duly invested several moves in clearing away pesky skirmishers and carefully moving into position to assault 2 faces of the village simultaneously in the British penultimate move of the game...

The second assault - Doing it right! The Black Watch go in the Front whilst the Diehards kick in the side doors, all properly supported - The School of Infantry Chief Instructor would be proud!
The second assault reaped the rewards of the careful preparation and coordinated approach, and, after a second round of hard fought combat, Gamorra Mayor fell. But it fell in the French last move - had the British left it too late to exploit forward across the river, or would the sight of their comrades from the 3rd Division pillaging King Joseph's baggage train spur them accross the river for some hard earned loot? 


Unfortunately for the French, the British final round of orders went without a hitch for once and the British were across the river to seal a decisive victory! But not everyone was happy:


 And so our belated commemoration of Vitoria ended on a note of excitement, and actually it was a thrilling and hard fought game throughout, with more attacks and counterattacks than an attacking and counterattacking thingy that likes to attack and ....

Anyway a great game, which has inspired me to plan more 28mm sized games at the Uni club...

Alan is a far more experience blogger than I, and a semi professional photographer to boot, so may I recommend you check out his account of the battle:

Kapitain Kobold - Vitoria 200

Sunday 14 July 2013

More Mabuhay Magic!


Getting ready for our Leipzig game in October, to coincide with the 200th Anniversary of 'The Battle of the Nations', I decided I needed to beef up my Austrian Collection...

Who better to turn to than my mate Fons, of the Mabuhay Miniature Painting Service, to
provide some quality reinforcements in a timely fashion without punishing the wallet too much!
 
 
Followers of my blog will know that I am very impressed with Fons' outfits' service, suffice it to repeat that Fons is an adherent of the 'under promise, over deliver' school of customer service! In short, highly recommended! 

Since I like my Kaiser-Konigliche Line Regiments to be 48 figures strong, I ordered 2 x 24-man units from Fons' new on-line ordering system, and explained that these were for one Regiment, so I only needed one Colour Bearer.
 
The regiment I ordered was IR No. 23. In common with most Austro-Hungarian Regiments, it changed names several times during the Napoleonic Wars, but for most of the period was entitled 'Kurfurst', or 'Grosserzerhog'; 'von Wurzburg'.
The Regiment was recruited from Western Galicia, and served with distinction in the major battles of the period, including Marengo, Austerlitz and Wagram. It was disbanded after the 1809 campaign, and embodied again in 1814.

Its facing colour was  Ponceaurot or Rouge clair, which it shared with IR's 8,37 & 39.

Needless to say I was very impressed with the painting of these, and my photography fails to do justice to the painter's skill with these fine new additions to my Kaiserlichs!

'You! Yes YOU! Double away to Fons' web page and check out the 28mm goodness'


Thursday 4 July 2013

Gettysburg Project 150 Megagame Day 3 - Pickett's Charge

Previous posts have described the first two days of our Megagame...We regrouped on the Sunday morning for the third and final day's gaming. The table was rearranged into a more conventional rectangle, albeit a large one 18' x 8'!

In all of our pregame discussions and planning, we had always known that there are difficulties in wargaming, as opposed to recreating, or a diorama, of Pickett's Charge. Its a difficult ask of the Confederate team to suspend their fore knowledge of what occurred!

Episcope view - a Hard target?

With hindsight, it is easy for us to say the charge was hopeless from the outset, and so wargamers blessed with the resources that we had have 2 options; either recreate the entire battlefield on Day 3 from dawn, and allow the Confederate team freeplay to attempt alternative options, such as flanking attacks, with the entire forces at their disposal, and the Union free to shuttle reserves within their interior lines of communication; or instead; set up just the forces and table to recreate Pickett's Charge as it ran, testing Lee's belief that the sheer courage and elan of his Rebels would see them through. An experiment to see if our 'Rebel Yell' rule and additional stamina would accurately recreate the morale quality of the Army of Northern Virginia at its best, and achieve the historical 'high tide of the Confederacy', or even surpass it!


Overnight, and in the morning as we reset the table, it was agreed that we would attempt the latter option of concentrating on Pickett's charge, if only for the sake of recreating this most iconic of actions!


Accordingly, the table was rearranged to reflect that sector, and only the troops and guns employed in that charge, or in support, of it were deployed on table, 9 Brigades for the Confederates, and 11 for the Union, centred around the 'Copse of Trees'. The Confederates had the option of either getting 2 or 3 rounds of pregame bombardment, and forgoing our 'Grand Battery' firing bonus house rules, or attempting to take the Copse of Trees in 10 moves without the bombardment phase, but enjoying the 'Grand Battery' firing bonuses and leaving their guns on the ridge where they were arrayed in their historical locations.


However, as the first few moves unfolded, a misunderstanding between the two teams, or perhaps even within the Confederate team, meant that we did not really achieve either of the options available for the infamous 'Pickett's Charge'; neither  the 'carbon copy' centered around the Copse of Trees Sector, nor the wider outflanking move to test other options available to Lee, with the whole battlefield, and with all units and reserves in play..... 

Looking toward the angle - Fingers Crossed!

For whatever reason, the two ends of the Confederate lines headed for the respective flanks of the fishhook, leaving the centre attack watered down to only 3 or 4 Brigades....which then endured most of the Union firepower! Matt was Union CinC for Day 3, and decided, at this stage, that rather than make a fuss we should just treat it as a enjoyable and challenging set of meeting engagements on the flanks, and see how things panned out in the centre. From what I could see these were hard fought engagements on both flanks, but the slimmed down 'Pickett's Charge Lite' was still exciting enough!

The 'Copse of Trees' top left. The downed Stars and Stripes mark the closest point of the Rebel Attack

So how did those few determined Brigades, those diehard Regiments in Butternut and Grey go with Pickett's Charge, struggling manfully on, across the slopes of death to the Union guns, alone and unsupported?

Crossfire! The Stars and Bars record part of the High Tide Mark...

Well, actually at three points they briefly managed to breach the Union Line atop Cemetery ridge, right at the apex of 'The Angle', before being leaving the Confederate high tide a mere 9 inches from the Copse of Trees, and only a foot from the Union table edge, including sending a Union Regiment, in hard cover, running. Full credit to Bryan and Rhys for gritting their teeth and coming so close! 

Oh Dixie! What might have been...

So, overall, did we fulfil the vision we had a year ago to commemorate the 150th Anniversary of Gettysburg in Grand Style? One of the problems with a project of this size is that it attracts a lot of interest, and despite our initial intent to only admit players who had 'qualified' by playing at least two of our practice games, could we really turn away late applicants? Of course not!
So did everyone read, understand, and accept our house rules? No, not really.....Did everyone appreciate and understand what we were trying to achieve with the scenarios? Not entirely...


Did we put on a grand spectacle worthy of the effort that had gone into it? Without a doubt!

Did everyone experience an enjoyable once-in-a lifetime total immersion 3 Day wargame that they will never forget? Damn straight they did!

Were old friends re-met and new ones made? Yes Mate!

Which reminds me - thanks to those members of the public who stopped by and showed an interest and complemented us. It was much appreciated!

Tuesday 2 July 2013

Gettysburg Project 150 Megagame Day 2

Day 2 - Looking SW toward Culps Hill (Left) and Cemy Hill (Right) Seminary ridge in the background
 I finished my blog about Day 1 with the question of when to set the scenario for Day 2? At dawn historically, and force the Rebs to spend most of the day marching and counter marching? Or freeplay, again from Dawn?
Devils Den across to the Peach Orchard.
The issue here was that Matt, the genial proprietor of the Hall of Heroes friendly local games store, who suggested this project right from the start, and put his heart and soul, as well as many dollars, into the spectacular terrain, would have been heartbroken if we had not had some action around his superbly modelled Round Tops and Devil's Den!
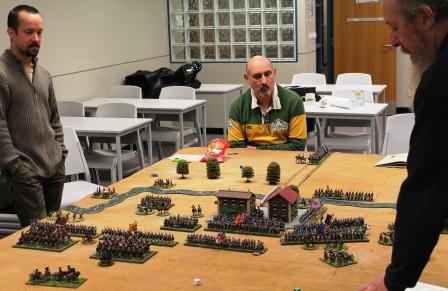
Episcope view - moving forward at 4.00 after a long day's march...
The answer was obvious - we would start the game from 4:00pm on the 2nd July, the point at which Longstreet's Corps crossed the start line of the Emmitsburg road.

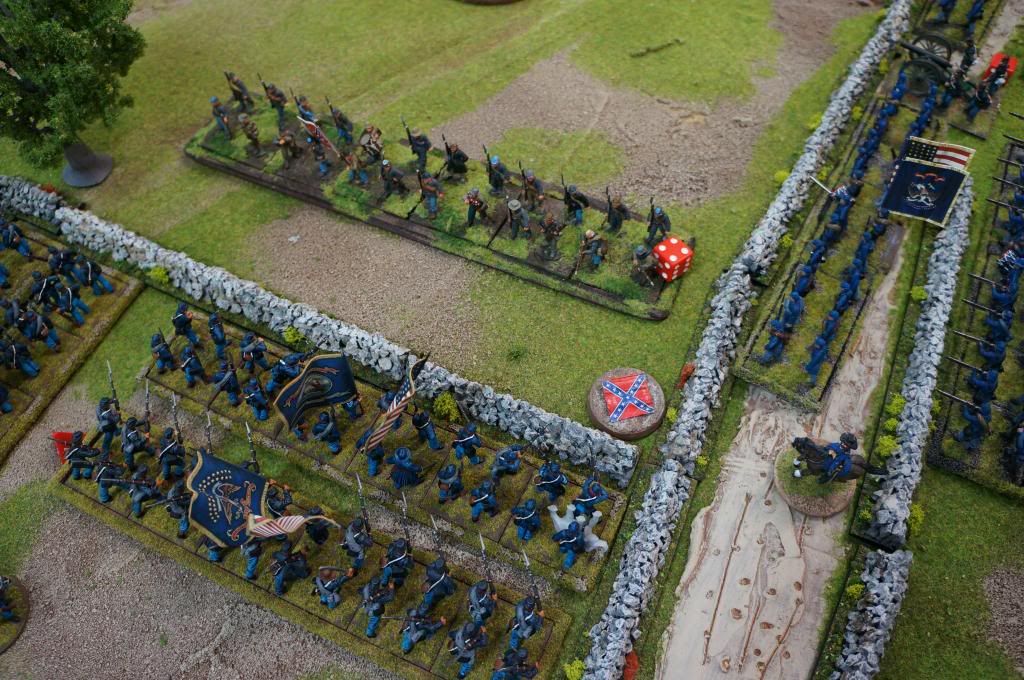
On this occasion the 20th Maine did not run out of ammo...
Now at this point my recollection of the Battle gets a little patchy, as I was relieved from Command and Philip took over for Day 2. I had long planned, with Matt, that my role on this day was to be Dan Sickles, so that I could ensure that III Corps was deployed well forward around the Wheatfield and Devils' Den!

What I can tell you is that the fighting in this sector was tough and exciting, the Rebels coming on like a wild tide of charging furies! My skirmishers did well though, exacting a toll as they traded space for casualties. However, numbers told, so that we had lost Devils Den by move 3! However, we managed to hold on to the Little Round top to the end!

However, at the further up the Fishhook, things did not go so well...
Jim as McLaws was pushing the centre hard, so that V Corps was diverted from our original intent of shoring up III Corps. Instead, a series of head to head scrambling fire fights and combats ensued around the Wheatfield. There was no longer any prospect of retaking Devil's Den, and indeed Hood was steadily threatening Big Round Top.
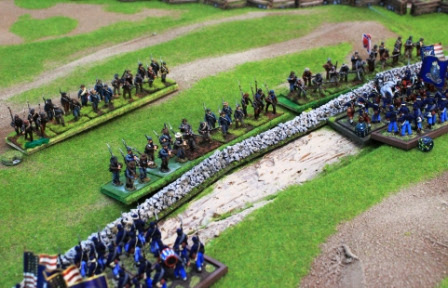
V Corps reinforce the Wheatfield.


Further North, things were even more precarious. James and Terry, as Early and Johnsone were steadily increasing the pressure on Robert and Dave attempting to hold onto Culps Hill:

Rob was a newcomer to our group, and inexperienced with Black Powder rules, so this was something of a baptism of fire for him, but he kept up a good front for several moves before things started to crumble:
One of Jubal Early's Brigades reaches the Union table edge...
To be honest, things weren't going to well for the boys in blue in the middle sector either, Lachlan, Phil, and Gus, our resident Gunner, who of course was Henry Hunt for the day:
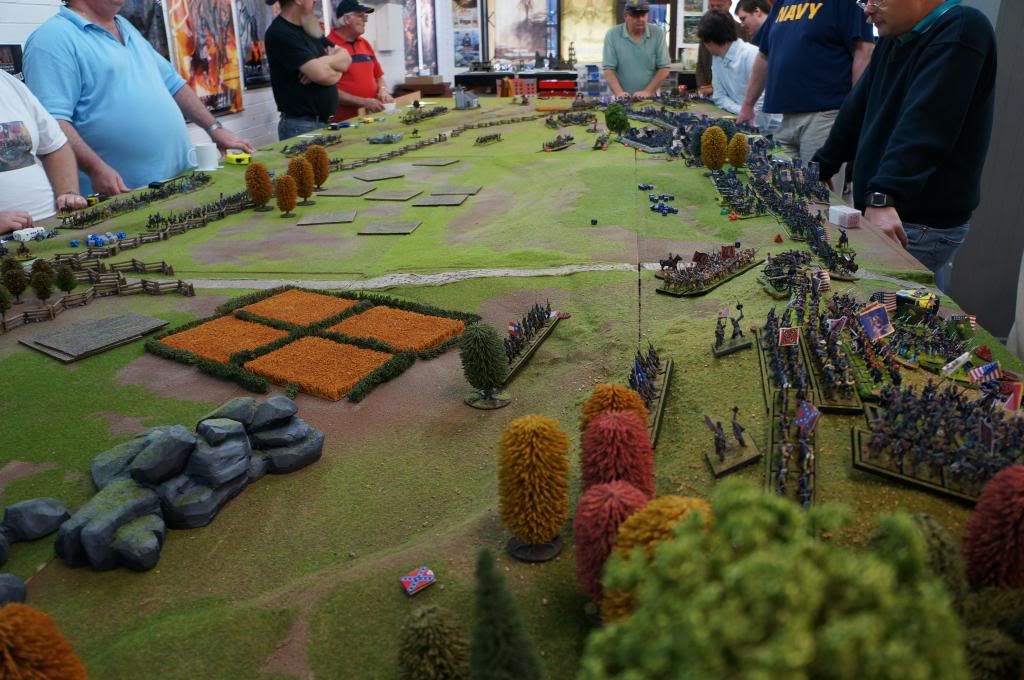
Cemetery Hill from Seminary Ridge
Rhys, Caesar and Sergio with Anderson's mob took their time in deploying, and I should have known from long experience from games at the Uni with Caesar that a slow start means trouble later:
Caesar has his thinking cap on....
Whereas around the flanks both Troy and James had reaped the benefits of charging like furies, these two were going for a bit of subtlety....Forcing Lachlan and co to constantly redirect their artillery positions...


The fighting was now fierce all along the line, with the Rebels applying pressure at all points. However, I am proud to say that most of our Regiments passed their 'Rebel Yell' checks, with very few actually fleeing the field! For several long moves the Union command held things together...
Cemetery Hill at tipping point....
Eventually however, despite heavy casualties, the Rebels surging around and over Cemetery Hill, forced the Union Reserve artillery to skeddadle at move 9. Philip was reluctant to concede, and certainly we had reserves aplenty as the game ended, but overall the Confederate team played hard and clever this day.

In the heat and passion of the action, a change in our playing style emerged in this most demanding of wargames; instead of allowing each sector to move through the Turn cycle of Orders - Firing - Hand to Hand in their own time, early confusion with the turns led the respective Team Captains to insist that their players all move through the phases together, even if sometimes that meant waiting for busier sectors to complete; and overall this worked well. Even with a game of this size and complexity, surely the largest ever played in Australia in 28mm, we managed to complete the planned 10 moves, with play starting at 10:30 and concluding at 5:30.
Episcope view - 'Here they come, boys!'
Overall, a hard fought, challenging game, which probably stretched the capabilities of Black Powder in terms of sheer numbers of units, but all finished the game with a sense of achievement and of a day well spent commemorating an epic day in grand style. Our mid game celebrations were fuelled by a huge pot of Gumbo which had been simmering all day...

Plans were made for the morrow, and the fateful Pickett's Charge...